
Herniated Disc Pain Relief: 10 Best Exercises & Stretches for Relief
Published on
Last updated
DisclaimerThis article is for general educational purposes and is not a substitute for professional medical advice, diagnosis, or treatment. Always consult a qualified healthcare provider for guidance specific to your condition.
What if the secret to overcoming herniated disc pain isn’t rest but the right movement?
Understanding Herniated Disc Pain
A herniated disc, sometimes called a slipped or ruptured disc, might sound like a minor annoyance, but don’t be fooled. When the soft, gel-like center of a spinal disc pushes through a crack in its tougher outer layer, it can unleash a cascade of agonizing symptoms. If that out-of-place disc material presses on nearby nerves, you could experience anything from a dull ache to a bloodcurdling, shooting pain that zaps down your leg (hello, sciatica). Some folks get off with just mild discomfort, while others are suddenly battling mobility nightmares.
Did you know almost 90% of herniated discs strike in the lower back (lumbar spine)? The pain can range from annoying to downright devastating, sometimes bringing numbness or weakness. But what’s really behind that relentless pain? Most of the time, it’s the disc pressing on nerve roots as they exit the spine—disrupting the brain’s communication with your muscles. That’s when you might notice tingling, weakness, or even trouble walking. And if you’ve felt your pain spike after sitting too long or standing for ages, you’re definitely not imagining things.
The Role of Exercise in Herniated Disc Recovery
You might think total rest is the answer, but that’s a trap. While a little downtime can help during acute flare-ups, lying around for too long can actually make things worse. The real magic happens with gentle movement and targeted stretches. Exercise gets blood pumping, delivers healing nutrients to injured tissues, and keeps you flexible. Plus, building up your core and back muscles lowers your risk of future disc disasters.
There’s solid science backing this up: people who move wisely tend to recover faster and enjoy longer-lasting relief. But beware, some exercises can backfire if they twist or overload your spine. That’s why the following ten exercises and stretches are chosen for their proven results, safety, and adaptability.
Step-by-Step Guide: 10 Best Exercises & Stretches
Ready to take control and fight back against herniated disc pain? Below, you’ll find easy-to-follow instructions for each move, the benefits you can expect, and smart precautions. Aim for 3–5 sessions per week, but always check with your doctor or physical therapist before jumping in.
1. Pelvic Tilt
Description:
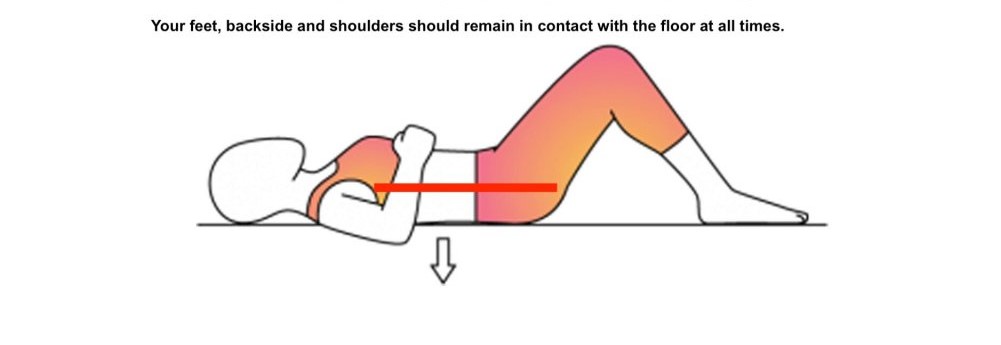
This gentle move fires up your lower abs and eases pressure on your lower back.
How to Perform:
- Lie on your back, knees bent, feet flat and hip-width apart.
- Rest your hands at your sides or on your hips.
- Tighten your abs and flatten your lower back into the floor.
- Hold for 5–10 seconds as you breathe.
- Release and repeat 10–15 times.
Benefits:
- Strengthens your core
- Promotes proper spinal alignment
Precautions:
No lifting your hips or arching your back, you want control, not momentum.
2. Knee-to-Chest Stretch
Description:
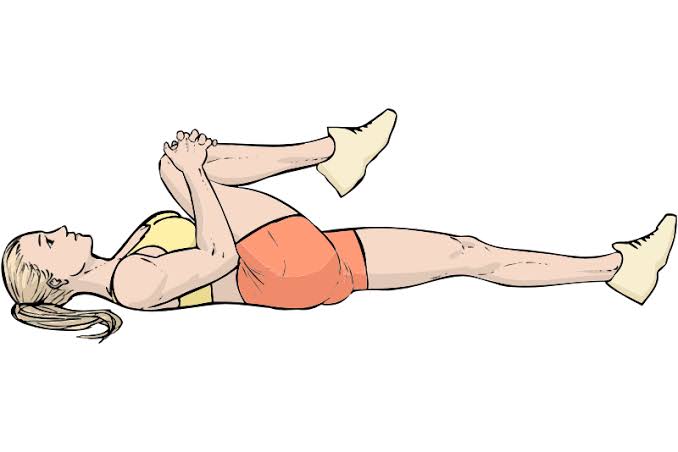
A simple move that lengthens your lower back and melts away tension.
How to Perform:
- Lie on your back with both knees bent.
- Gently pull one knee to your chest, gripping with both hands.
- Hold for 15–30 seconds, then swap legs.
- Repeat 2–4 times per leg.
Benefits:
- Relieves lower back tension
- Boosts lumbar flexibility
Precautions:
Slow and steady wins the race no bouncing!
3. Cat-Cow Stretch
Description:
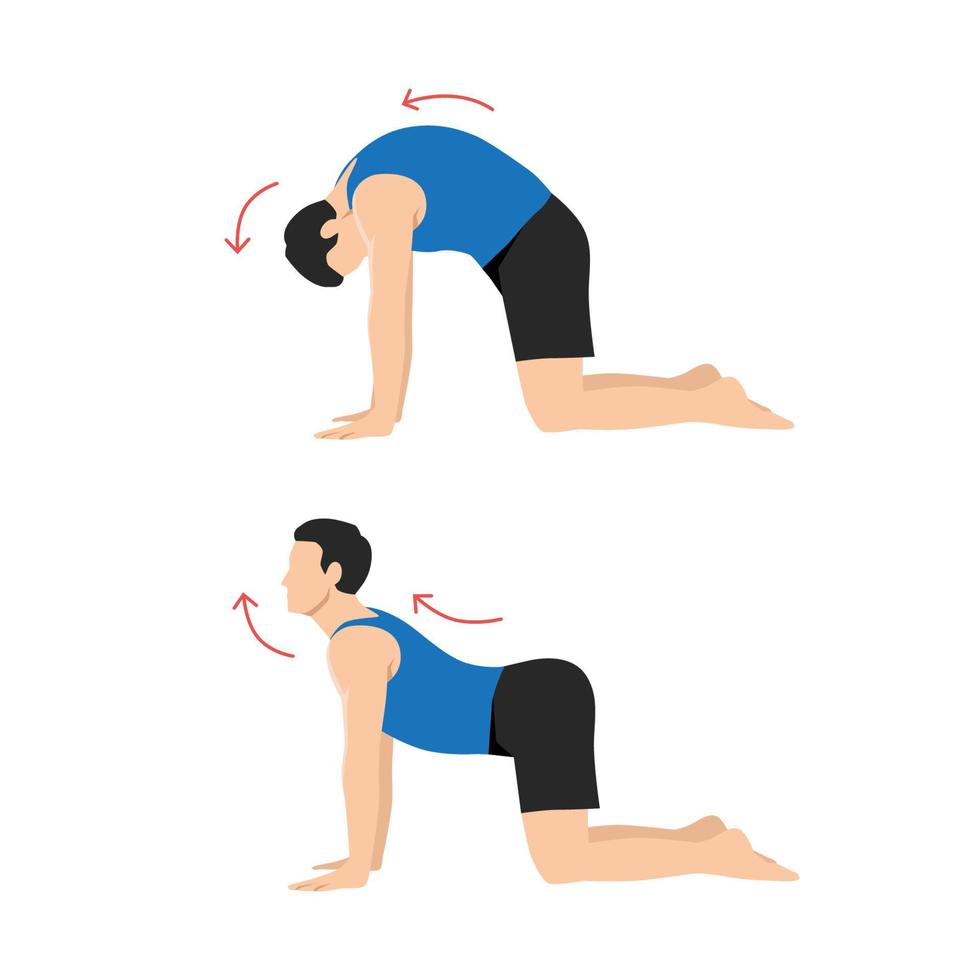
This classic stretch gets your spine moving and your blood flowing.
How to Perform:
- Get on hands and knees, wrists under shoulders, knees under hips.
- Inhale and arch your back (cow), lifting head and tailbone.
- Exhale and round your spine (cat), tucking chin and pelvis.
- Flow back and forth for 30–60 seconds.
Benefits:
- Enhances spinal mobility
- Soothes and relaxes the body
Precautions:
Ease up if you feel any sharp pain.
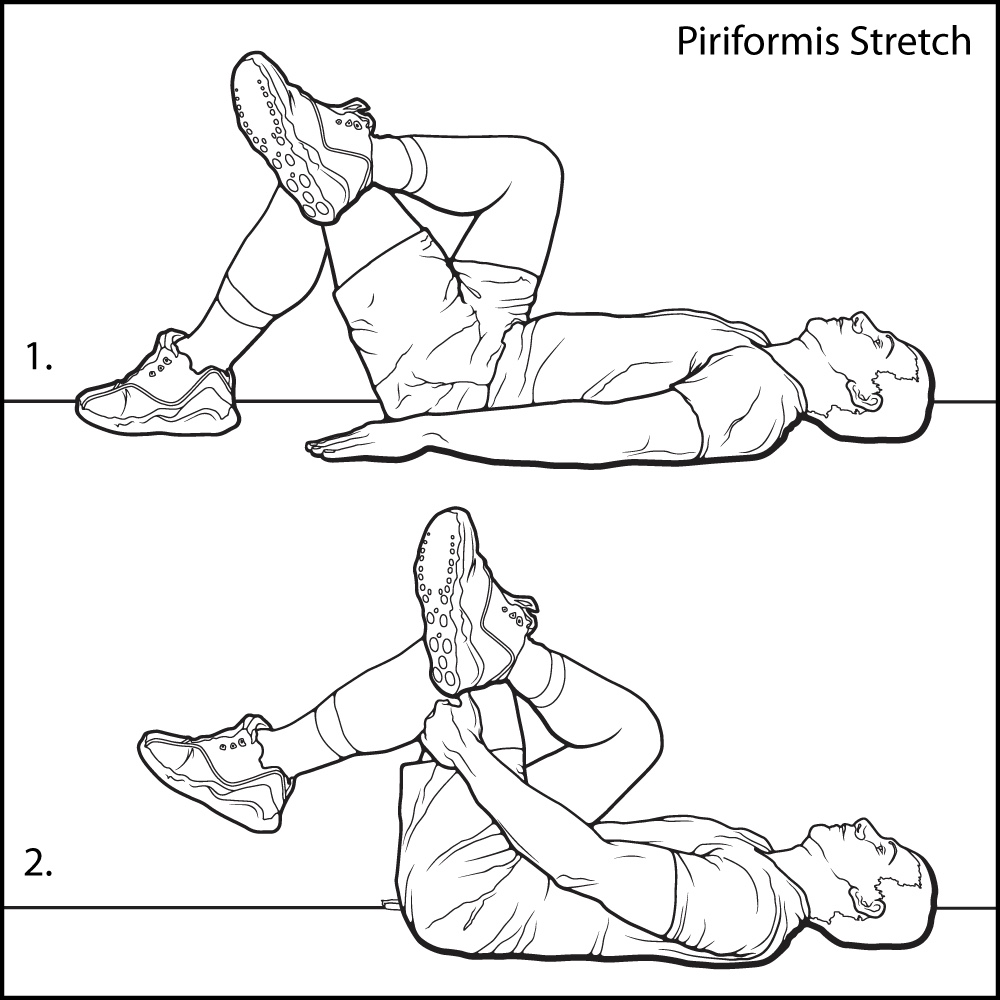
4. Piriformis Stretch
Description:
Targets the piriformis muscle, the sneaky culprit behind some sciatica misery.
How to Perform:
- Lie on your back, knees bent.
- Cross one ankle over the opposite knee.
- Gently pull the uncrossed leg toward your chest until you feel a stretch in your buttock.
- Hold for 20–30 seconds, then switch sides.
- Repeat 2–3 times per side.
Benefits:
- Calms sciatic nerve irritation
- Eases buttock and lower back tension
Precautions:
Never force the stretch, listen to your body.
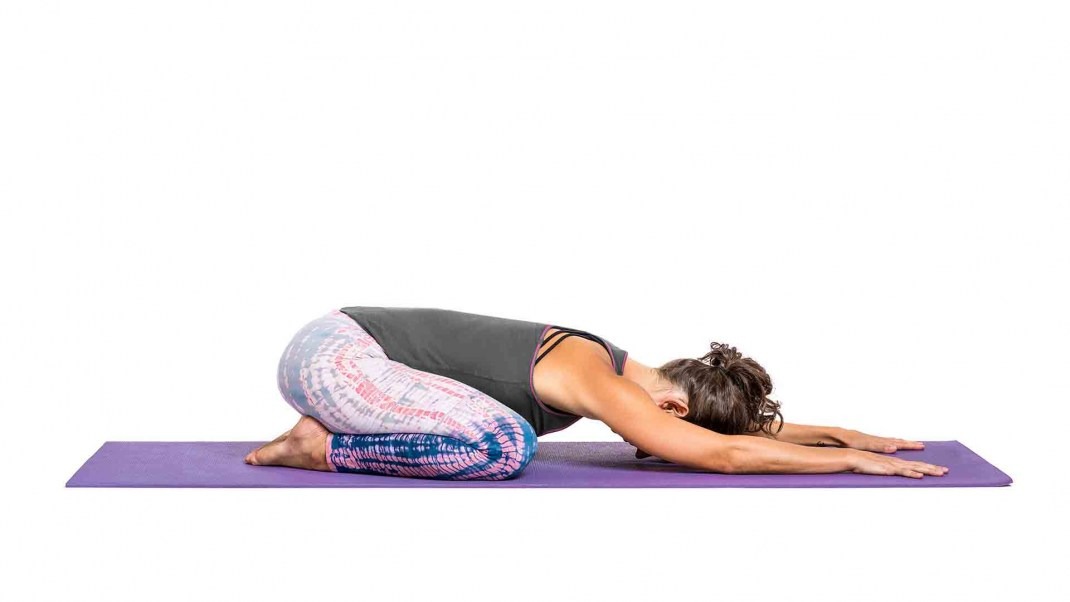
5. Child’s Pose
Description:
A soothing yoga pose that decompresses your spine and relaxes your mind.
How to Perform:
- Kneel, sitting back on your heels.
- Reach arms forward and lower your forehead to the floor.
- Hold for 30–60 seconds, breathing deeply.
- Rise up slowly.
Benefits:
- Gently stretches the lower back
- Relieves stress and tension
Precautions:
If your knees complain, add a cushion under your knees or hips.
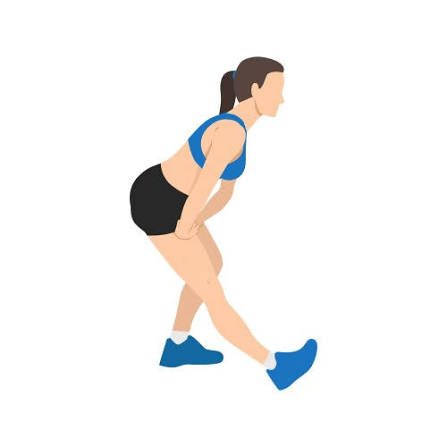
6. Standing Hamstring Stretch
Description:
Lengthens tight hamstrings, often a hidden cause of lower back strain.
How to Perform:
- Stand tall, and place one heel on a step or low chair.
- Keep your leg straight; hinge forward from the hips.
- Hold for 20–30 seconds, then switch legs.
- Repeat 2–3 times per leg.
Benefits:
- Improves hamstring flexibility
- Less strain on your lower back
Precautions:
Keep your back straight, avoid rounding your spine.
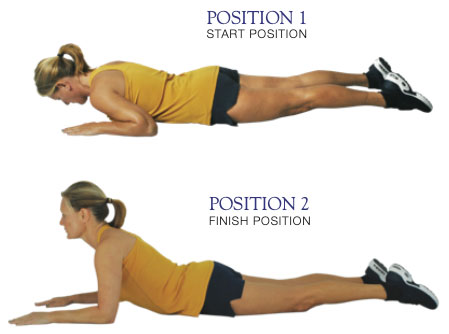
7. McKenzie Press-Up (Prone Extension)
Description:
A go-to move for lumbar disc injuries encourages disc material to slide back where it belongs.
How to Perform:
- Lie face down, hands under shoulders, elbows bent.
- Press your upper body up, hips and legs stay flat.
- Hold for 5–10 seconds, then lower down.
- Repeat 10–12 times.
Benefits:
- Helps move disc away from nerve roots
- Relieves central and radiating pain
Precautions:
Stop if pain shoots down your legs or gets worse.
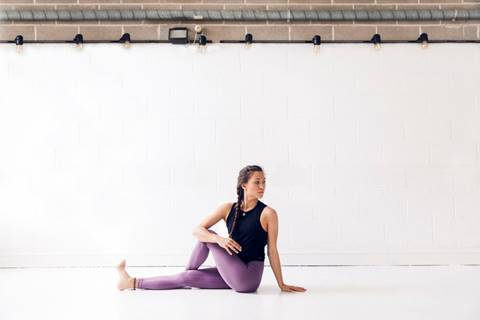
8. Seated Spinal Twist
Description:
An easy twist to unlock stiffness and boost spinal flexibility.
How to Perform:
- Sit with legs extended.
- Cross one leg over the other, foot flat on the floor.
- Twist your torso toward the bent knee, using the opposite arm for support.
- Hold for 15–30 seconds, then switch sides.
- Repeat 2–3 times per side.
Benefits:
- Increases flexibility
- Relieves tension in back and hips
Precautions:
Move gently if you feel sharp pain, ease off.
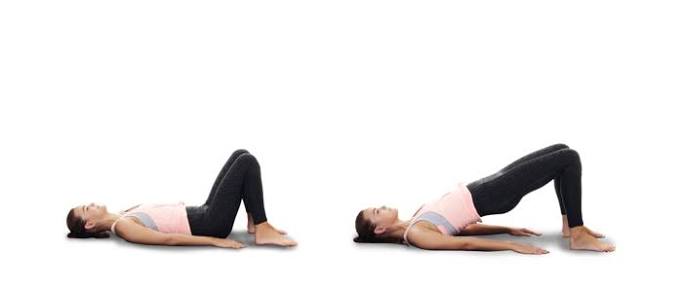
9. Bridge Exercise
Description:
Builds strength in your glutes and lower back, stabilizing the whole spine.
How to Perform:
- Lie on your back, knees bent, feet flat.
- Tighten your abs and glutes.
- Lift your hips, forming a straight line from shoulders to knees.
- Hold for 5–10 seconds, then lower down.
- Do 10–15 reps.
Benefits:
- Strengthens the posterior chain
- Supports spinal alignment
Precautions:
Don’t overarch keep the movement controlled.
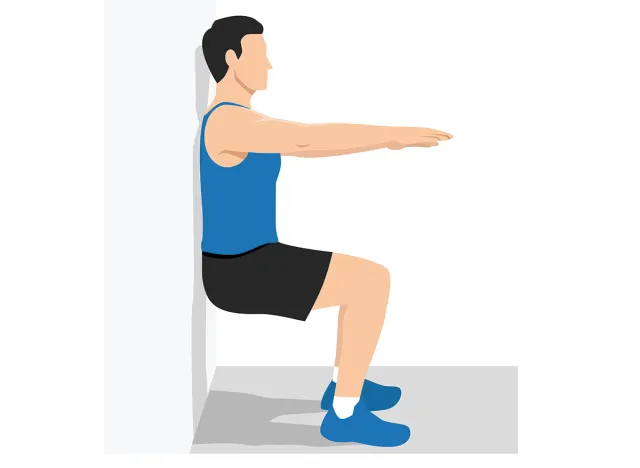
10. Wall Sits
Description:
A static move that fires up the quads and encourages good posture.
How to Perform:
- Stand with your back against a wall, feet shoulder-width apart.
- Slide down until knees are at 90 degrees.
- Hold for 15–30 seconds, working up to a minute.
- Rise slowly.
Benefits:
- Builds leg and core strength
- Takes pressure off the lower back
Precautions:
Skip this if you have severe knee pain or instability.
Table: Summary of Exercises, Target Areas, and Key Benefits
| Exercise | Target Area | Key Benefit |
|---|---|---|
| Pelvic Tilt | Lower back, core | Core strengthening |
| Knee-to-Chest Stretch | Lumbar spine | Lower back tension relief |
| Cat-Cow Stretch | Entire spine | Improved mobility |
| Piriformis Stretch | Buttocks, hips | Sciatic nerve relief |
| Child’s Pose | Lower back | Decompression, relaxation |
| Standing Hamstring Stretch | Hamstrings, back | Flexibility, reduced strain |
| McKenzie Press-Up | Lumbar spine | Disc centralization |
| Seated Spinal Twist | Spine, hips | Flexibility, reduced stiffness |
| Bridge Exercise | Glutes, lower back | Posterior chain strength |
| Wall Sits | Quadriceps, core | Posture support |
Precautions and When to Avoid Exercises
While movement is usually a game-changer, there are times when you need to slam the brakes. If you experience severe or worsening neurological symptoms like sudden bladder trouble, numbness in your groin, or growing leg weakness, seek medical help right away. And if a particular move sparks sharp, radiating pain (especially shooting down your legs), hit pause and check with your healthcare provider.
A little stretch or gentle fatigue is normal, but true pain is your body’s red flag. Adjust your exercises or dial down the intensity if needed. For most people, sticking with it and being mindful leads to real, long-lasting improvement.
Tips for Safe and Effective Relief
Want to make the most of your efforts and avoid painful setbacks? Here are some essential tips:
- Start slowly: Go easy at first, increasing reps and hold times as you build confidence.
- Prioritize good form: Quality matters more than quantity pay attention to alignment and control.
- Combine with other interventions: Physical therapy, ergonomic tweaks, and heat or ice can give your recovery a major boost.
- Listen to your body: If things feel wrong, stop. Some discomfort is okay, but sharp pain is a hard no.
- Stay consistent: Regular practice, aiming for several days a week, will bring the best, most sensational results.
When you put these exercises together with a smart treatment plan, you’re not just overcoming pain you’re reclaiming your freedom, your confidence, and your victory over herniated disc challenges. Stick with it, and you’ll be amazed at what your body can achieve.
Conclusion
Effectively managing herniated disc pain requires a balanced approach that prioritizes safe movement, targeted exercises, and careful listening to your body. The ten exercises and stretches outlined offer practical relief and support spinal health when performed consistently and with proper technique. Remember, while these movements can be highly beneficial, it's essential to consult a healthcare professional before starting any new routine, especially if you experience significant or worsening symptoms. Ultimately, reclaiming comfort and mobility is possible through patience, persistence, and a personalized exercise plan.
Frequently asked questions
- Can I do these exercises if my herniated disc is severe?
- If you have severe symptoms such as significant weakness, numbness, or loss of bladder/bowel control, consult a healthcare provider immediately. For less severe cases, gentle exercises may help, but always get medical clearance first.
- How often should I perform these exercises?
- Most people benefit from doing these exercises 3–5 times per week, but frequency can be adjusted based on comfort and individual progress.
- What should I do if an exercise makes my pain worse?
- Stop the exercise immediately and consult with your doctor or physical therapist. Pain that radiates or increases sharply is a sign to avoid that movement.
Stay updated
Get new health articles on WhatsApp
By subscribing, you agree to receive health updates via WhatsApp. Unsubscribe anytime.